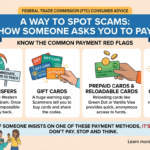
A recent report by the Federal Trade Commission details a way to spot scams - how someone asks you to pay. Let’s say someone contacts you unexpectedly and says you have to pay to fix a problem, get a prize, or something else. But then they say the only way to pay is by bank transfer, wire transfer, cryptocurrency, payment app, or gift card. Well, reports to the FTC show that’s a scam. Last year, people reported the largest losses — more than $4 billion in total — to scams where they … [Read more...]
July 28, 2026 By Computer Techs
July 21, 2026 By Computer Techs
The End of the Text Message Code: How to Keep Your Accounts Safe
Keeping up with technology can sometimes feel like an endless chore, especially when the rules for staying safe online seem to change every day. However, a major shift is currently happening that is incredibly important for protecting your digital identity and finances. Microsoft recently announced that they are phasing out SMS (text message) codes as a way to verify your identity when logging into personal accounts. Because Microsoft is leading this charge, it’s highly likely other major … [Read more...]
July 21, 2026 By Computer Techs
Do this now before scammers or hackers take over your email, financial or other online accounts
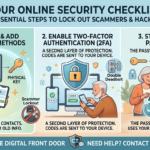
In today’s digital age, our personal information is more valuable than ever. We use our computers and smartphones for almost everything—from checking bank balances to keeping in touch with family. But that convenience also opens doors for hackers and scams. Cybercriminals are constantly looking for easy targets, and losing access to your accounts can range from a minor headache to a catastrophic event. Your email account, in particular, is the “master key” to your digital life. It's where you … [Read more...]
June 9, 2026 By Computer Techs
Why Your Email’s Contact List Is the Most Dangerous Place to Store Your Passwords
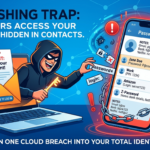
You may have done this before: you’re creating a new account, you need a password, and you know you’re going to forget it. In a pinch, you open up your email, create a new contact with the name of the website you just signed up for, and dump all your sensitive login info into the notes section. It’s convenient, it syncs across your devices, and it’s right there when you need it. But here’s the reality: saving passwords in your email contacts list is an absolute goldmine for hackers. While it … [Read more...]
June 9, 2026 By Computer Techs
How to Spot Phishing Scams Instantly Using Gemini in Chrome or Copilot in Edge
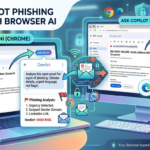
We’ve all been there: you open your inbox and find an email that sets off alarm bells. Maybe it’s a "critical security alert" from your bank, an unexpected delivery failure notification, or an urgent invoice from a vendor. It looks official, but something feels off. Now there's a built-in cybersecurity assistant right in your browser toolbar. Whether you use Gemini in Chrome or Copilot in Microsoft Edge, you can leverage sidebar AI to dissect a sketchy email in seconds. Here is how to do it … [Read more...]
June 8, 2026 By Computer Techs
How to spot a CAPTCHA scam

The FTC is reporting a new phishing scam that looks a lot like the CAPTCHA requests you might be used to seeing. Real CAPTCHAs give you image- or text-based tasks to prove you’re not a robot — something like typing letters and numbers exactly as they appear, or matching pictures of things like fire hydrants or traffic lights. Here’s how the fake CAPTCHA requests happen…and how you could wind up installing malware on your own device. You get an unexpected CAPTCHA request while browsing a … [Read more...]
November 21, 2025 By Computer Techs
Do this now: Protect your browser passwords from prying eyes

Browsers are designed for speed. By default, if you are logged into your computer, your browser assumes it is safe to autofill your usernames and passwords the moment a login page loads. This creates a dangerous "single point of failure." If you step away from your unlocked laptop for just a minute, or if someone gains remote access to your computer, they have instant access to your bank, email, and sensitive accounts without needing to know a single password. You should fix this … [Read more...]
November 21, 2025 By Computer Techs
Browsing Made Easier and Safer: What’s New in Your Web Browser

The internet is always changing, and so are the tools we use to explore it—our web browsers (like Chrome, Edge, and Safari). In 2025, you might notice some exciting new features designed to make your time online easier, safer, and smarter, especially when it comes to logging in and protecting you from tricky scams. 🤖 Smart Helpers: The New AI Features Artificial Intelligence (AI) is like a clever assistant built right into your browser now. These new AI tools are designed to help you … [Read more...]
August 19, 2025 By Computer Techs
Using the Same Password Everywhere Is Like Using Your House Key for All of Your Locks

Imagine if one single key unlocked your house, your car, your office, and even your safety deposit box at the bank. Convenient? Sure. Safe? Absolutely not. If you were to lose that key—or if someone were to steal it—they would instantly have access to everything important in your life. That’s exactly what happens when you reuse the same password across multiple accounts. The Convenience Trap It’s easy to see why people reuse passwords. With dozens of logins for banking, shopping, email, … [Read more...]
August 19, 2025 By Computer Techs
Check the Source to Help Stop Phishing and Scams

In today’s digital world, phishing and online scams remain some of the most common ways criminals trick people into giving up sensitive information. These attacks often look convincing—emails that appear to be from your bank, websites that resemble popular retailers, or texts that mimic delivery services. However, most phishing attempts can be uncovered with a simple habit: checking the source email address or website before taking action. Why Source Details Matter Scammers rely on urgency … [Read more...]