
You may have done this before: you’re creating a new account, you need a password, and you know you’re going to forget it. In a pinch, you open up your email, create a new contact with the name of the website you just signed up for, and dump all your sensitive login info into the notes section. It’s convenient, it syncs across your devices, and it’s right there when you need it. But here’s the reality: saving passwords in your email contacts list is an absolute goldmine for hackers. While it … [Read more...]
June 9, 2026 By Computer Techs
January 14, 2026 By Computer Techs
How to save money on internet, phone and TV service in 2026
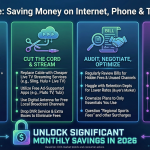
Saving money on internet, phone, TV, and cell service can be a game of strategy! Here are some tactics to consider: General Strategies: Negotiate your current bills: Call your providers and politely but firmly negotiate a lower rate or better deal. Mention competitors' offers or threaten to cancel. Be prepared to walk away. Bundle services: Consider bundling multiple services with the same provider. For example, Spectrum and AT&T both offer considerable discounts on wireless phone … [Read more...]
January 1, 2026 By Computer Techs
Backup Options in 2026: Safeguarding Your Digital Life Across Devices
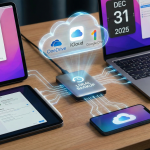
In 2026, our digital lives are more intertwined with our devices than ever before. From cherished family photos to critical work documents to keeping track of medications and health history, the data on our computers, tablets, and smartphones is invaluable. Losing it can range from a minor inconvenience to a catastrophic event. Fortunately, a robust ecosystem of backup solutions exists, offering peace of mind across Windows, macOS, iOS, iPadOS, and Android devices. This article explores the … [Read more...]
June 24, 2025 By Computer Techs
A Beginner’s Guide to Passkeys: How to Set Them Up, Use Them, and Sync Across Devices

Updated 6/10/26 - clarified platform and browser support: If you’re tired of remembering complex passwords or worrying about phishing attacks, passkeys offer a simpler, safer alternative. Major platforms like Google, Microsoft, Apple and Yahoo now support passkeys, and they’re designed to replace passwords entirely. In this guide, we’ll explain what passkeys are, how to set them up, and how you can use them across multiple devices—even for the same account. A passkey is a modern, more … [Read more...]
April 3, 2025 By Computer Techs
Need a new printer? Why you should consider getting laser/LED vs. inkjet

When purchasing a new printer, there are several reasons you should consider getting laser vs. inkjet. We are often asked to troubleshoot printing problems with inkjet printers. With Nevada's dry climate, if you don't frequently print something the ink in inkjet printers often dries out and clogs the ink cartridges and print heads, thus reducing print quality or completely rendering the printer useless. When shopping for a printer you may be inclined to get an inexpensive printer because … [Read more...]
March 19, 2025 By Computer Techs
Having problems with a website? Try these tips.

That moment of frustration when a website refuses to cooperate is all too familiar. Whether it's a slow loading page, a broken link, or a complete inability to connect, website problems can throw a wrench in your productivity or simply be a major annoyance. But before you throw your hands up in despair, take a deep breath and try these simple yet effective troubleshooting tips. You might be surprised at how often the solution is quick and easy. Try an alternative web browser Most … [Read more...]
February 25, 2025 By Computer Techs
What You Need to Know About the End of Support for Windows 10
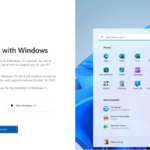
Click on image to view full-screen. Microsoft ended support for Windows 10 on October 14, 2025. There's no more free updates*, security patches, or technical support available from Microsoft - unless you take action. Most users have 3 options: upgrade to Windows 11, get a new computer with Windows 11, or extend Windows 10 security updates until October 2027. Upgrading to Windows 11 is recommended for most users for its advanced security, improved performance, and new features. … [Read more...]
January 20, 2025 By Computer Techs
Why You Should Choose an App Over a Website on Your Mobile Device

In today’s digital age, we often find ourselves debating whether to use a mobile app or a website for everyday tasks like shopping, banking, or simply staying informed. While websites are versatile and easily accessible, mobile apps offer unique advantages that make them the better choice for many activities on a smartphone or tablet. Here are the top reasons why you should consider using an app over a website on your mobile device: 1. Enhanced User Experience Mobile apps are specifically … [Read more...]
February 20, 2024 By Computer Techs
Charge Smarter, Not Harder: Maximizing Battery Life in Your Devices
Let's face it, dead batteries are never convenient. Whether you're on a call, streaming a movie, or crunching deadlines, a depleted battery can throw your tech-powered day into chaos. But fret not, battery-conscious friend! By understanding how and when to charge your devices, you can extend their lifespan and keep them powered up longer. Debunking the myths: First, let's clear the air on some common misconceptions: Myth: Leaving your phone plugged in overnight damages the … [Read more...]
February 20, 2024 By Computer Techs
How Seniors and Less-Tech-Savvy People Can Use Artificial Intelligence

AI in 2024: Your Friendly, Tech-Savvy Sidekick Artificial intelligence (AI) might conjure images of robots taking over the world, but the reality is far more down-to-earth. In 2024, AI is not here to replace us, but to assist us, and that includes everyone, regardless of age or tech skills. Whether you're a senior citizen looking for a helping hand or someone who finds technology intimidating, AI can be your friendly sidekick, making daily life easier and more enjoyable. Here are some … [Read more...]