Updated 6/26/26: Sticker shock: RAM and SSDs are major costly components that are used in computers. Due to demand by AI data centers and global supply shortages for RAM and SSDs since late 2025, prices for new computers have increased by an average of a few hundred dollars this year. But sale prices still exist. You may be reading this because the operating system on your existing computer is no longer supported. Since you'll likely be spending the next 5-10 years or more with your next … [Read more...]
January 26, 2026 By Computer Techs
January 14, 2026 By Computer Techs
How to save money on internet, phone and TV service in 2026
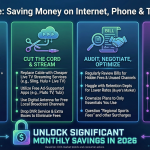
Saving money on internet, phone, TV, and cell service can be a game of strategy! Here are some tactics to consider: General Strategies: Negotiate your current bills: Call your providers and politely but firmly negotiate a lower rate or better deal. Mention competitors' offers or threaten to cancel. Be prepared to walk away. Bundle services: Consider bundling multiple services with the same provider. For example, Spectrum and AT&T both offer considerable discounts on wireless phone … [Read more...]
January 1, 2026 By Computer Techs
The Case Against Using the Email that AT&T and Spectrum Provides

Most people that have been using the Internet in the Reno area for a long time have an email address that ends in @att.net, @sbcglobal.net, or @charter.net. You probably got this email address for free when you first signed up for internet service years ago. It is the address your friends use to contact you, and it is the username for financial, device, social media and medical accounts. The idea of changing it now probably feels like a huge headache. However, Computer Techs and other … [Read more...]
January 1, 2026 By Computer Techs
Backup Options in 2026: Safeguarding Your Digital Life Across Devices
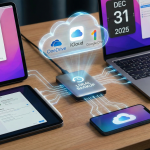
In 2026, our digital lives are more intertwined with our devices than ever before. From cherished family photos to critical work documents to keeping track of medications and health history, the data on our computers, tablets, and smartphones is invaluable. Losing it can range from a minor inconvenience to a catastrophic event. Fortunately, a robust ecosystem of backup solutions exists, offering peace of mind across Windows, macOS, iOS, iPadOS, and Android devices. This article explores the … [Read more...]
December 31, 2025 By Computer Techs
Fortress Inbox: The 4 Pillars of Securing Your Email Account
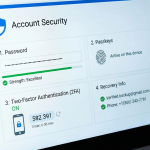
Your email is the "master key" to your digital life. It’s where you receive sign-in codes and password resets for your bank, social media, healthcare portals and even other email accounts that you likely have. If a hacker gets into your email, they can get into most everything else. Securing it doesn’t have to be complicated. By implementing these four layers of defense—unique passwords, passkeys, 2FA, and recovery info—you can make your account virtually impossible to breach. … [Read more...]
December 26, 2025 By Computer Techs
How to use a passkey on your smartphone to sign in on a computer
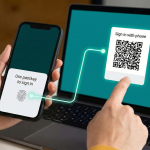
One of the best things about passkeys is that they aren’t trapped on just one device. Even if you haven't synced your passkeys through a cloud service like iCloud Keychain or Google Password Manager, you can still use your iPhone or Android phone as a "physical key" to sign into websites on any computer. This cross-device login uses a combination of Bluetooth (to prove the phone is physically near the computer) and a QR code (to establish a secure encrypted connection). If you aren't … [Read more...]
November 21, 2025 By Computer Techs
Do this now: Protect your browser passwords from prying eyes

Browsers are designed for speed. By default, if you are logged into your computer, your browser assumes it is safe to autofill your usernames and passwords the moment a login page loads. This creates a dangerous "single point of failure." If you step away from your unlocked laptop for just a minute, or if someone gains remote access to your computer, they have instant access to your bank, email, and sensitive accounts without needing to know a single password. You should fix this … [Read more...]
November 21, 2025 By Computer Techs
Browsing Made Easier and Safer: What’s New in Your Web Browser

The internet is always changing, and so are the tools we use to explore it—our web browsers (like Chrome, Edge, and Safari). In 2025, you might notice some exciting new features designed to make your time online easier, safer, and smarter, especially when it comes to logging in and protecting you from tricky scams. 🤖 Smart Helpers: The New AI Features Artificial Intelligence (AI) is like a clever assistant built right into your browser now. These new AI tools are designed to help you … [Read more...]
October 1, 2025 By Computer Techs
Beware: The Latest Tech Scams You Need to Know About

Updated 6/10/26: Cybercriminals are always looking for new ways to trick people, and we at Computer Techs are seeing an uptick in scams that target computer and internet users. These scams often look convincing on the surface, but with a little extra caution, you can spot the red flags before becoming a victim. Fake Invitations and Social Security Statements One of the most dangerous scams making the rounds is an email that appears to come from someone you know—a neighbor, friend, … [Read more...]
September 24, 2025 By Computer Techs
Using Webmail for Reliable Email Troubleshooting

In today’s digital world, many people access their email through email clients or apps installed on their mobile devices or computers. Popular email clients include the Mail app on Mac and iOS, Microsoft Outlook and Thunderbird on Windows, and Samsung Email on Samsung Android devices. These applications provide a convenient, organized way to view and respond to email from one or multiple accounts in a single interface. However, when encountering email problems such as missing messages, … [Read more...]