Updated 6/26/26: Sticker shock: RAM and SSDs are major costly components that are used in computers. Due to demand by AI data centers and global supply shortages for RAM and SSDs since late 2025, prices for new computers have increased by an average of a few hundred dollars this year. But sale prices still exist. You may be reading this because the operating system on your existing computer is no longer supported. Since you'll likely be spending the next 5-10 years or more with your next … [Read more...]
January 26, 2026 By Computer Techs
October 1, 2025 By Computer Techs
Beware: The Latest Tech Scams You Need to Know About

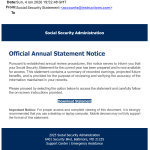
Updated 6/10/26: Cybercriminals are always looking for new ways to trick people, and we at Computer Techs are seeing an uptick in scams that target computer and internet users. These scams often look convincing on the surface, but with a little extra caution, you can spot the red flags before becoming a victim. Fake Invitations and Social Security Statements One of the most dangerous scams making the rounds is an email that appears to come from someone you know—a neighbor, friend, … [Read more...]
February 25, 2025 By Computer Techs
What You Need to Know About the End of Support for Windows 10
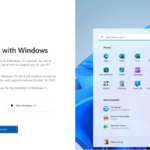
Click on image to view full-screen. Microsoft ended support for Windows 10 on October 14, 2025. There's no more free updates*, security patches, or technical support available from Microsoft - unless you take action. Most users have 3 options: upgrade to Windows 11, get a new computer with Windows 11, or extend Windows 10 security updates until October 2027. Upgrading to Windows 11 is recommended for most users for its advanced security, improved performance, and new features. … [Read more...]
June 9, 2026 By Computer Techs
Why Your Email’s Contact List Is the Most Dangerous Place to Store Your Passwords
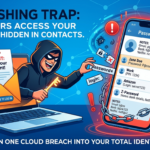
You may have done this before: you’re creating a new account, you need a password, and you know you’re going to forget it. In a pinch, you open up your email, create a new contact with the name of the website you just signed up for, and dump all your sensitive login info into the notes section. It’s convenient, it syncs across your devices, and it’s right there when you need it. But here’s the reality: saving passwords in your email contacts list is an absolute goldmine for hackers. While it … [Read more...]
June 9, 2026 By Computer Techs
How to Spot Phishing Scams Instantly Using Gemini in Chrome or Copilot in Edge
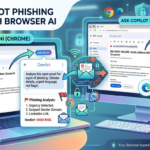
We’ve all been there: you open your inbox and find an email that sets off alarm bells. Maybe it’s a "critical security alert" from your bank, an unexpected delivery failure notification, or an urgent invoice from a vendor. It looks official, but something feels off. Now there's a built-in cybersecurity assistant right in your browser toolbar. Whether you use Gemini in Chrome or Copilot in Microsoft Edge, you can leverage sidebar AI to dissect a sketchy email in seconds. Here is how to do it … [Read more...]
June 8, 2026 By Computer Techs
How to spot a CAPTCHA scam

The FTC is reporting a new phishing scam that looks a lot like the CAPTCHA requests you might be used to seeing. Real CAPTCHAs give you image- or text-based tasks to prove you’re not a robot — something like typing letters and numbers exactly as they appear, or matching pictures of things like fire hydrants or traffic lights. Here’s how the fake CAPTCHA requests happen…and how you could wind up installing malware on your own device. You get an unexpected CAPTCHA request while browsing a … [Read more...]
May 30, 2026 By Computer Techs
How to shut down your computer – you may be doing it wrong
Do you think pressing the power button on your computer is the proper method to shut down or turn it off? That's fine if you can't otherwise shut it off. But in normal circumstances, use the correct method shown in the video below. If you can't shut down your computer the normal way If you get a popup on your computer that's telling you to call a phone number to fix a sudden problem with your computer - it's a scam. If you can't close the scary webpage and/or if it's telling you to not … [Read more...]
May 28, 2026 By Computer Techs
The surprising things we’ve discovered with our cybersecurity checkups for individuals

In today's digital age, our personal information is more valuable than ever. From online banking to social media, we're constantly sharing sensitive data that could be a target for cybercriminals. That's why cybersecurity checkups have become increasingly important. These assessments can reveal vulnerabilities in our online presence that we may not even be aware of. Here are some surprising things we've discovered through cybersecurity checkups for individuals: 1. Weak or Reused … [Read more...]
May 26, 2026 By Computer Techs
Why we typically don’t recommend paying for data removal or identity theft protection services
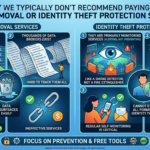
Subscription limits and structural barriers: Data removal services cannot completely delete your information from the internet due to insurmountable legal and structural barriers, such as criminal-run dark web marketplaces that ignore deletion requests and government public records (like property deeds and court records) that are exempt from privacy laws. The "Whack-a-Mole" subscription trap: Automated removal tools face resistance from data brokers requiring manual identity … [Read more...]
May 7, 2026 By Computer Techs
Yes, we can help you with your smartphone too
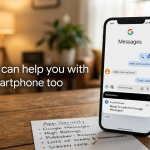
Most of us think of our smartphones as just another tool in the pocket, but they’ve quickly become the most important piece of technology we own. From managing finances to staying connected with family, your phone is a powerhouse. That’s why we want to make sure yours is running smoothly, securely, and up to date with the latest changes in the mobile world. The Big Switch: Saying Goodbye to Samsung Messages If you use a Samsung smartphone, you might notice some changes coming to messaging. … [Read more...]
April 23, 2026 By Computer Techs
Why YOU are the best protection against computer viruses

In the early days of computing, the primary digital threat was the "computer virus"—malicious code designed to disrupt your system or delete files. Today, however, the digital landscape has shifted dramatically. While traditional viruses still exist, modern threats have evolved into sophisticated phishing and social engineering scams that target the user rather than the software. Because these scams rely on human psychology rather than technical exploits, your own vigilance is now the most … [Read more...]
April 21, 2026 By Computer Techs
How to add emergency contact info to the home screen of your smartphone
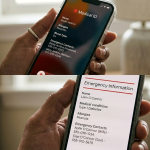
The smartphones that we carry around with us can be used for just about everything - from banking to social media. But one of the most powerful tools your phone offers is often overlooked: its ability to act as a digital medical alert bracelet in a crisis. If you are ever in an accident and/or unable to communicate, first responders are trained to check your phone for emergency information. On older phones people would put in contacts with the prefix "ICE" - or In Case of Emergency. But on … [Read more...]
February 1, 2026 By Computer Techs
The most dangerous new threat on your computer is not a virus, and may come from someone you know
Updated 4/24/26: One of the most dangerous scams this year is an email that appears to come from someone you know— a neighbor, friend, a professional service provider or even a family member. The message might say something like “RSVP for the celebration (of life)” ,“Click here to view the invitation.”, “Review this important document”, “Check out the pictures” or "We’re updating our records”. Click each of the 2 screenshots above to view a larger version of the phishing … [Read more...]